The key to understanding “Dynamic Programming” is that it’s not referring to “computer programming”

When seeing the phrase “dynamic programming” in an algorithms class or leetcode study guide, the first question people ask is “what does ‘dynamic’ mean in this context?”.

The key question is instead “what does ‘programming’ mean in this context?”, because it does not mean “computer programming”.

Instead it refers to, as the Oxford English Dictionary puts it,

programming. n.

4. Planning carried out for purposes of control, management, or administration.

So really, it’s closer to “TV programming” (as in creating a schedule), than “computer programming” (as in writing software).

The term was coined in the 1950s at a time when civil engineers would say they’re “programming a new office building” to mean they’re “planning the order and timeline for each sub-step required to construct a new office building”.

Ignoring a million details, the resulting plan (the “program”) would be something like

  1. Site preparation
  2. Excavation
  3. Foundation
  4. Structural framework
  5. Exterior
  6. Roofing
  7. Interior
  8. Hvac/electrical/plumbing
  9. Fixtures/furnishing
  10. Final inspection

(Real engineers can rip this example to shreds in the comments of whichever site they came from.)

The steps of the plan must necessarily be in dependency order, because each step likely relies on previous steps be done. Electricians will fail to complete their work if they arrive at the worksite while the loggers are still clearing trees.

It shouldn’t need stating, but you wouldn’t pour three separate concrete foundations if you have three steps that need a foundation. You’d do it once so that it’s ready for anything that needs it. That’s the point of ordering the steps.

Dynamic Programming in Computer Science similarly means “planning the order of each sub-step required to solve the complete problem”.

When “programming” fibonacci(10), the “program” would be something like (given that we already have fib(0) and fib(1) by definition):

  1. fib(2)
  2. fib(3)
  3. fib(4)
  4. fib(5)
  5. fib(6)
  6. fib(7)
  7. fib(8)
  8. fib(9)
  9. fib(10)

The steps of the plan must necessarily be in dependency order, because each step likely relies on previous steps to be done. fib(7) will not be able to get its work done if fib(5) or fib(6) are not ready.

It shouldn’t need stating, but you wouldn’t compute fib(8) three separate times if you have three steps that need it. You’d do it once so that it’s ready for anything that needs it. That’s the point of ordering the steps.

This “program” could be planned top down, i.e. starting with fib(10) and determining that you first need to solve fib(9) and fib(8), and repeating the process recursively.

It could also be planned bottom up, by noticing the pattern that every fibonacci number will have to be computed in order anyways, so you might as well start from 0 and work your way up.

Either way, the final plan is the same, and both are considered Dynamic Programming.

So next time you see someone struggling to understand what could possibly make Dynamic Programming “dynamic”, suggest they instead look into what makes it “programming”.


The term “Dynamic Programming” was coined by Richard Bellman in the 1950s, long before anyone knew how confusing it would become. In his autobiography, he describes how he ended up with this name:

The 1950s were not good years for mathematical research.

We had a very interesting gentleman in Washington named Wilson. He was Secretary of Defense, and he actually had a pathological fear and hatred of the word, research.

I’m not using the term lightly; I’m using it precisely. His face would suffuse, he would turn red, and he would get violent if people used the term, research, in his presence.

You can imagine how he felt, then, about the term, mathematical.

The RAND Corporation was employed by the Air Force, and the Air Force had Wilson as its boss, essentially. Hence, I felt I had to do something to shield Wilson and the Air Force from the fact that I was really doing mathematics inside the RAND Corporation.

What title, what name, could I choose?

In the first place I was interested in planning, in decision making, in thinking. But planning, is not a good word for various reasons. I decided therefore to use the word, “programming”.

I wanted to get across the idea that this was dynamic, this was multistage, this was time-varying I thought, lets kill two birds with one stone. Lets take a word that has an absolutely precise meaning, namely dynamic, in the classical physical sense. It also has a very interesting property as an adjective, and that is its impossible to use the word, dynamic, in a pejorative sense. Try thinking of some combination that will possibly give it a pejorative meaning. It’s impossible*.

Thus, I thought dynamic programming was a good name. It was something not even a Congressman could object to. So I used it as an umbrella for my activities.

*This Haskell fan’s contender is “dynamic typing” :P

That time I wasted weeks hand optimizing assembly because I benchmarked on random data

Once upon a time I worked in the field of Java Optimizations. 

The target system was a distributed data processing platform that ran across hundreds of thousands of machines. At such scales, a 0.5% improvement would easily make up my salary going forward, and 2% was a good result for the half.

That doesn’t mean it was easy. Never have I ever seen such a highly optimized Java codebase. Not before, not since. 

Every low hanging fruit had long since been picked clean. For example, there was minimal use of java.lang.String because ain’t nobody got time for a second allocation of a char[] with associated indirection and GC churn.

In other words, we were looking at increasingly heroic optimizations to justify our own existence. 

Through careful, large scale profiling, I discovered that data serialization was a small but worthwhile place to focus. In particular, VarInt encoding used enough CPU time to warrant investigation. 

If you’re not familiar, a VarInt, or more specifically ULEB128, is a byte efficient way to encode arbitrary integers. You use however many groups of 7 bits you need for your number, and use the 8th bit to specify whether there is another byte coming. 

Numbers needing 7-bits or less (< 128) are encoded as 0nnnnnn

14-bit (<16384), 1nnnnnnn 0nnnnnnn

21bit (<2097152), 1nnnnnnn 1nnnnnnn 0nnnnnnn

And so on, in little-endian order. 

For a 32bit int, you will need between 1 and 5 bytes. For a 64bit long, you will need between 1 and 10. 

They are used in Google Protobuf, Apache/Facebook Thrift, WASM, DWARF, and other formats that want a compact binary representation without sacrificing range. 

The interface the system used for this encoding was essentially int encodeLong(byte[] buffer, int offset, long data), returning the number of bytes written. 

Conventional wisdom is that this is way too small to benefit from native code.

But conventional wisdom is for conventional development. 

We were in the early phases of forking the JVM, had recently built the infrastructure to implement custom optimizations, and we were itching to use it. 

Engineers don’t exactly need convincing to work on fun assembly puzzles to begin with, but the empire builders in management were additionally competing in a Manifest Destiny style land grab as the company maneuvered to take control of its tech stack from end to end. They were pushing this as hard as anyone to stake their claims.

So off I went to write an ultra optimized VarInt encoder that the JVM JIT could serialize straight into the instruction stream, bypassing the normal overhead associated with JNI.

And I sure did. 

My hand coded, branchless, SIMD assembly algorithm performed 4x better than the already highly optimized Java implementation!

(The exact details escape me, but it was some combination of using BMI2 to scatter bits into groups of 7, and some AVX2 comparisons and bit extensions to compute the continuation mask and determine the resulting length.)

This was verified in a benchmark that ran both versions on billions of random numbers, confirming both the huge speedup and the bit-for-bit compatibility of the result.

I spent probably two weeks implementing, testing, integrating, polishing, and landing this change. 

Finally I tried to measure the difference in prod. 

Nothing. 

Measuring ~1% improvements is always a challenge, but even with huge A/B runs, the difference was exactly nothing.

I did some investigations, and eventually found why my benchmarks were so misleading compared to real world performance. 

It was because I was using random numbers. 

As it turns out, mathematically speaking, most numbers are huge. By an infinite margin. There are dramatically many more 18 digit numbers, than there are 3 digit numbers.

In fact, if you generate random 64bit unsigned longs and try to encode them as ULEB128,

  • 50% will need 10 bytes
  • ~49.6% will need 9 bytes
  • ~0.38% will need 8 bytes
  • ~0.003% will need 7 bytes
  • ~0.00000000000009% will need 2 bytes
  • ~0.0000000000000006% will need 1 byte

Meanwhile, if I look around my real world right now, I see several dozen numbers. Almost all fit into two bytes with room to spare. A “60” watt charger, an old Covid-“19” test, page “1” of “2” of some statement. A few zip codes and reference numbers break the pattern, but overall, real numbers tend to be small.

That’s exactly why people use VarInt in the first place.

The Java version had to do more work the more bytes it had to output. By measuring on random numbers, I was inadvertently doing all my testing against the algorithm’s unrealistic worst case scenario.

When I adjusted my benchmark to primarily generate small numbers, the speedup vanished entirely.

I ended up rolling back the change, and wrote off the time spent as a proof-of-concept for developing and productionizing a custom JIT optimization.

(And I crossed “SIMD” off my programming bingo card.)

FiniteCurve.com: TSP art on a CPU budget

tl;dr: My hobby project FiniteCurve.com is a web app that draws an image with a single, long, non-intersecting line. This post explains the process.

Like many engineers, I’ve had a long standing fascination with mazes. One manifestation of this was elementary school drawings of ever-winding but never overlapping lines, like this:

They were fascinating to look at but tedious to draw. When I learned programming a few years later, I wrote many grid-based maze generators. However, while I’ve pondered the problem every several years since, I never ended up writing one that could replicate that organic, free-flowing, space filling style.

That is, until recently.

After 20 years, my pondering coincided with a blank spot on my wall, and I finally decided to implement it. Here’s Central Europe drawn with a single, ever-winding line. Click to see the entire world (10000×5000, 4MB).

Central Europe drawn as a single line

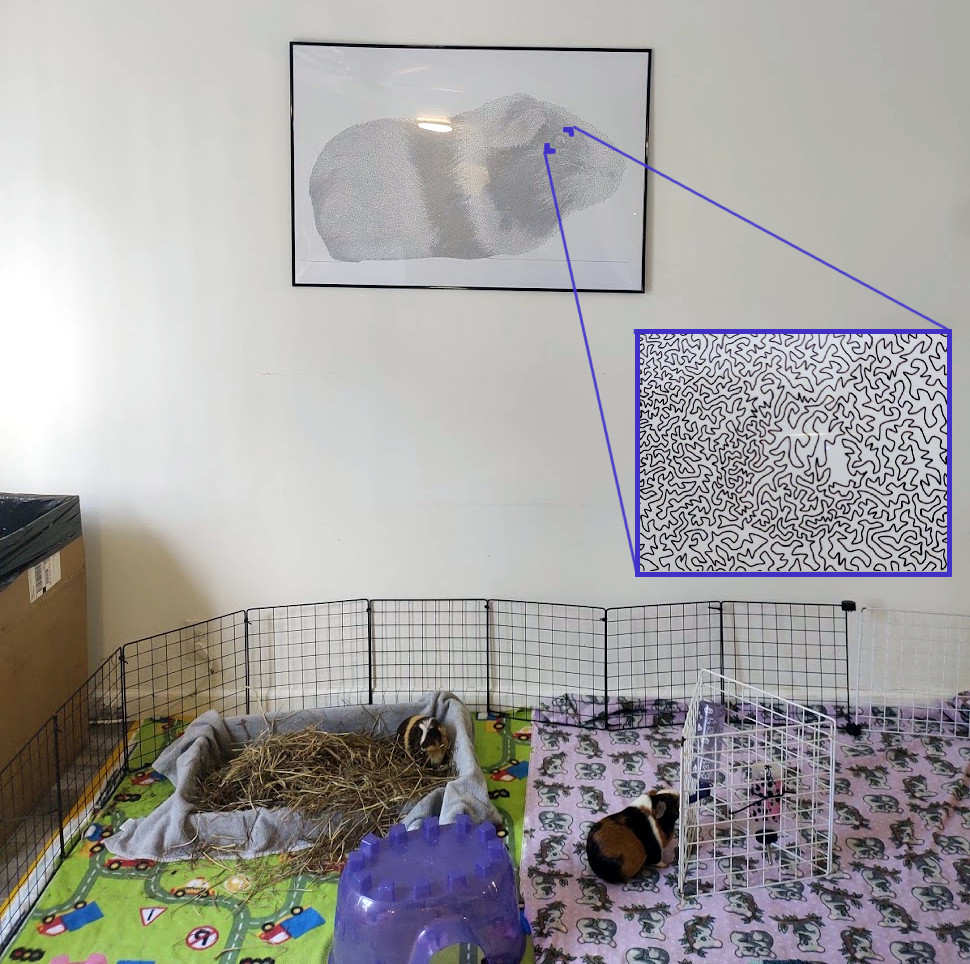
The actual artwork I put on my wall — which looks better in person but doesn’t convey the concept as convincingly in a blog post — was of my guinea pig. Maze obsession aside, my favorite part is how discoverable it is:

Guinea pig drawn with a single line

It looks like a grayscale photo from a distance, but as you get closer you realize that it’s made up of something, thereby inviting you to get closer still until you have your nose pressed up against it, tracing the 160 meter line around.

I never intended to publish the program, but the result was striking enough that I compiled the C++ code to Wasm via emscripten, added a scrappy frontend, and put it online. You can play around with it on FiniteCurve.com. The source code is koalaman/finitecurve.com on GitHub.

I was not aware of this until I after I finished it, but this style closely resembles what’s known as "TSP art". Traditionally, it’s done by laying out points with a density according to a grayscale image, solving the Traveling Salesman Problem, and graphing the result.

Of course, even approximating TSP is hard, so generating such images takes minutes for smaller ones and days for large ones.

Since I only cared about the visual impression and not about the optimality or completeness of the resulting path, I just used some ad-hoc heuristics. The tool runs in seconds.

A keltic knot, but even knottier as thick bands are drawn with a single, space filling line

So how does it work?

The general approach is to generate a point cloud with a density matching a grayscale input image, and finding something close to a Hamiltonian path that doesn’t cross itself.

It’s a short description, but there are multiple noteworthy details:

  • The path does not need to be short, as it would in the Travelling Salesman Problem. Arguably, the longer the better.
  • The path must not cross itself. A TSP solution under triangle inequality will get this for free, but we have to work for it.
  • The path does not need to be complete. In fact, it shouldn’t be. Any far-away point is better left unvisited to avoid causing unsightly artifacts. Unvisited central points will merely cause small visual glitches.
  • It’s a path and not a cycle. Not because it’s easy, but because it’s hard. A visual cycle can trivially be created by tracing the circumference of a spanning tree in O(n) time, and where’s the fun in that?

To generate a point cloud, I simply went over each pixel in a grayscale input and added a vertex there if there wasn’t already one within some distance d determined by the shade of the pixel:

A point cloud resembling a guinea pig

I then added edges from each node to all nearby nodes, as long as the edge did not cross an existing edge. This way, there would be no crossing edges, so any Hamiltonian path would avoid crossing itself:

A grid resembling a guinea pig

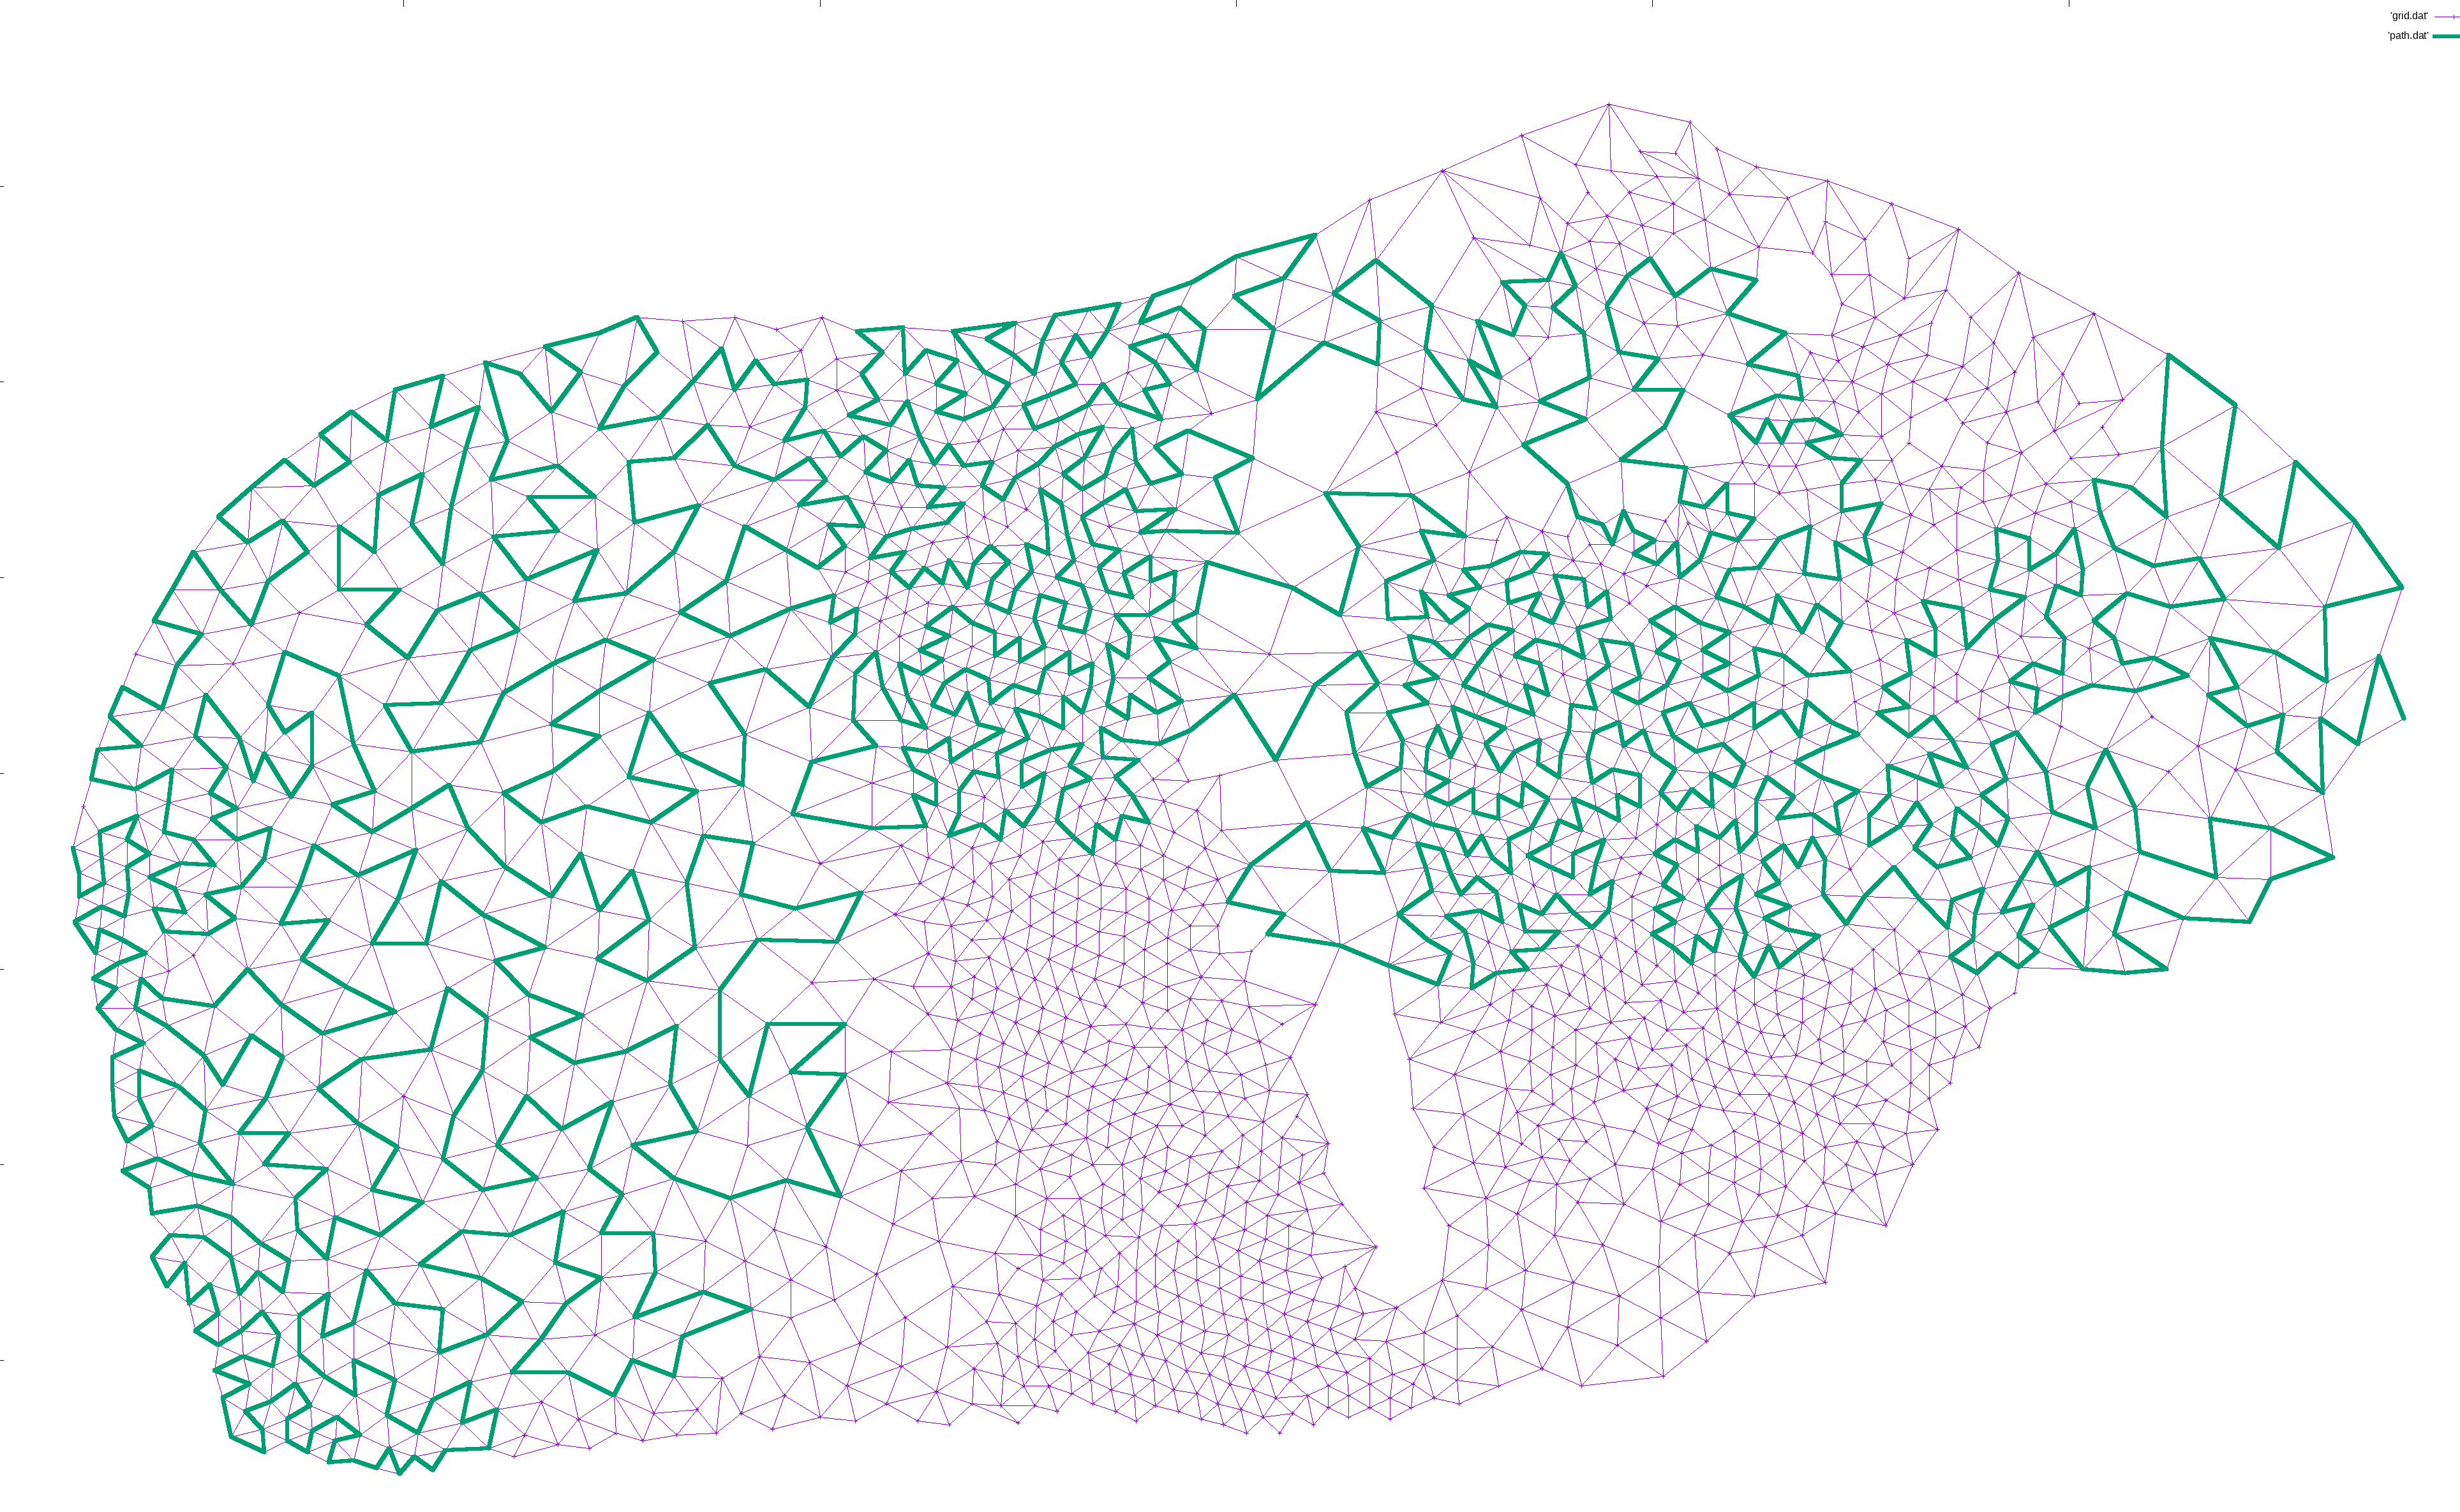
I then designated an arbitrary start point and an end point. The exact points don’t matter, but for ease of locating them, I picked the left-most and right-most points, and used plain ol’ depth first search to find a path between them:

A grid still resembling a guinea pig, with a meandering line from butt to snout

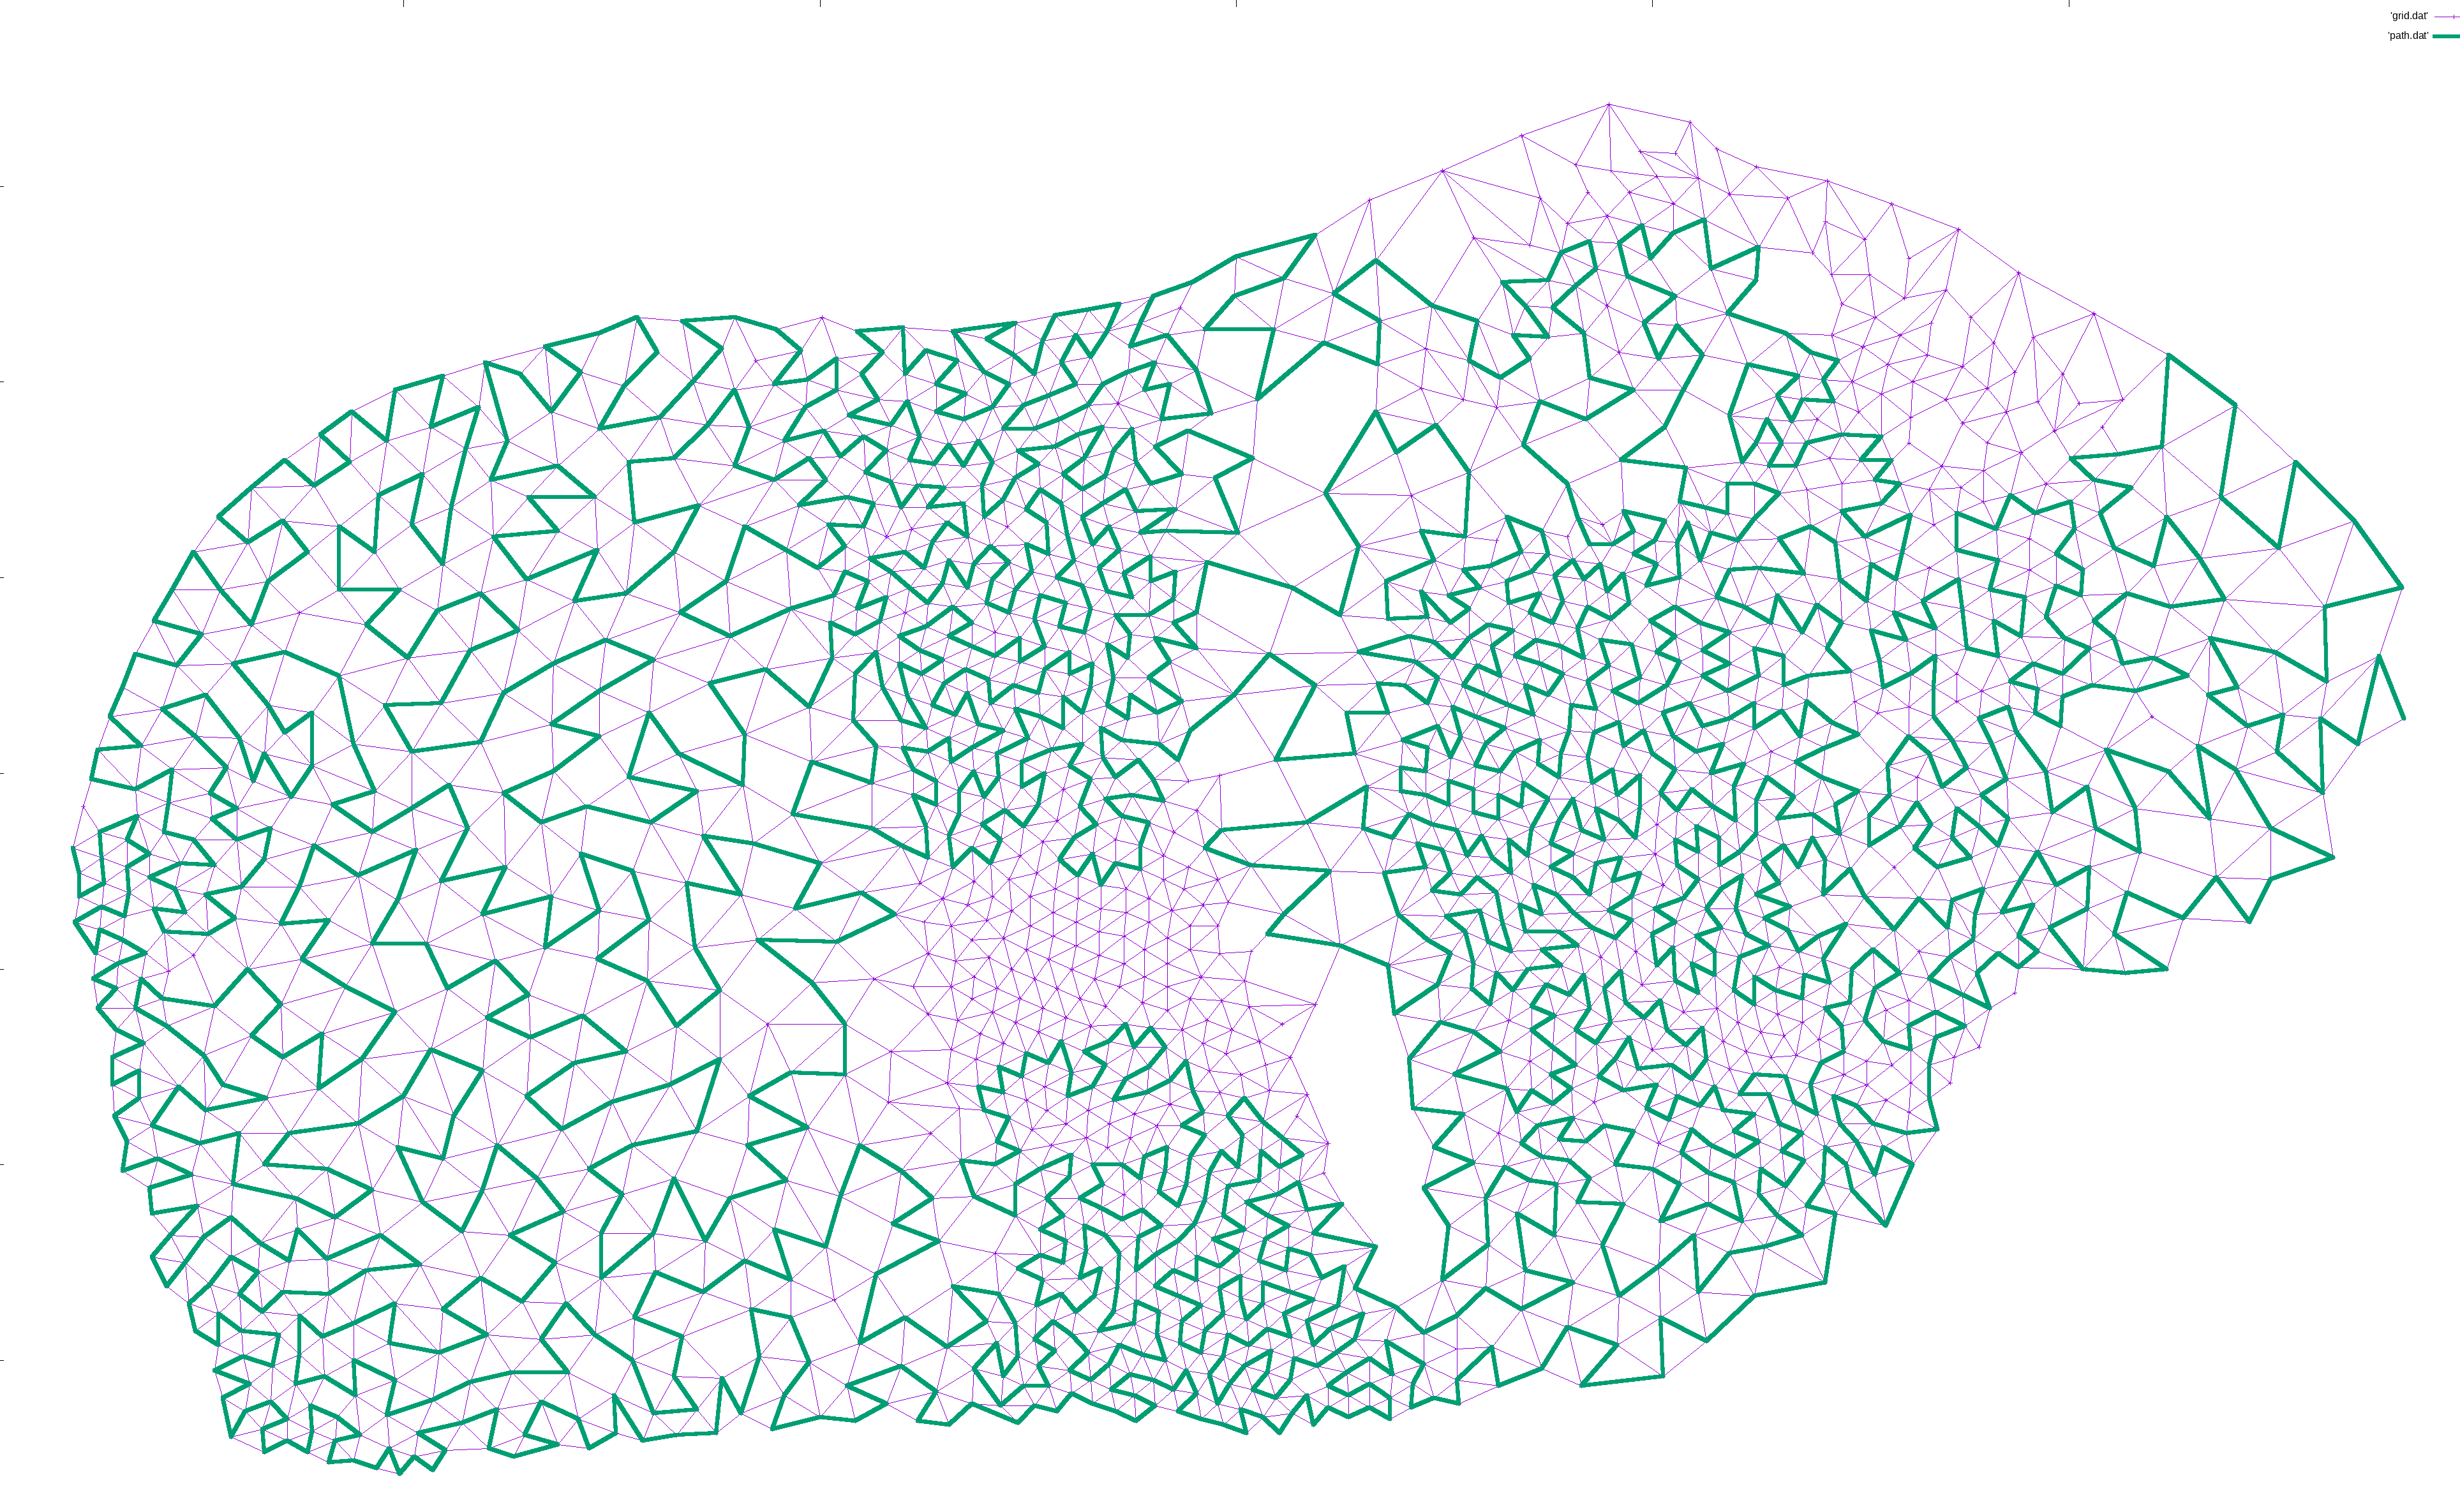
I would then iteratively expand the path. For each pair of points (p1, p2) along the path, I would find a neighbor n of p1 and try to find a path from n to p2. If found, I would expanded the path from p1->p2 to p1->n->...->p2, which is guaranteed to be longer in terms of nodes. This way, the path gradually lengthened to cover most of the nodes:

A grid still resembling a guinea pig, with an even longer meandering line from butt to snout

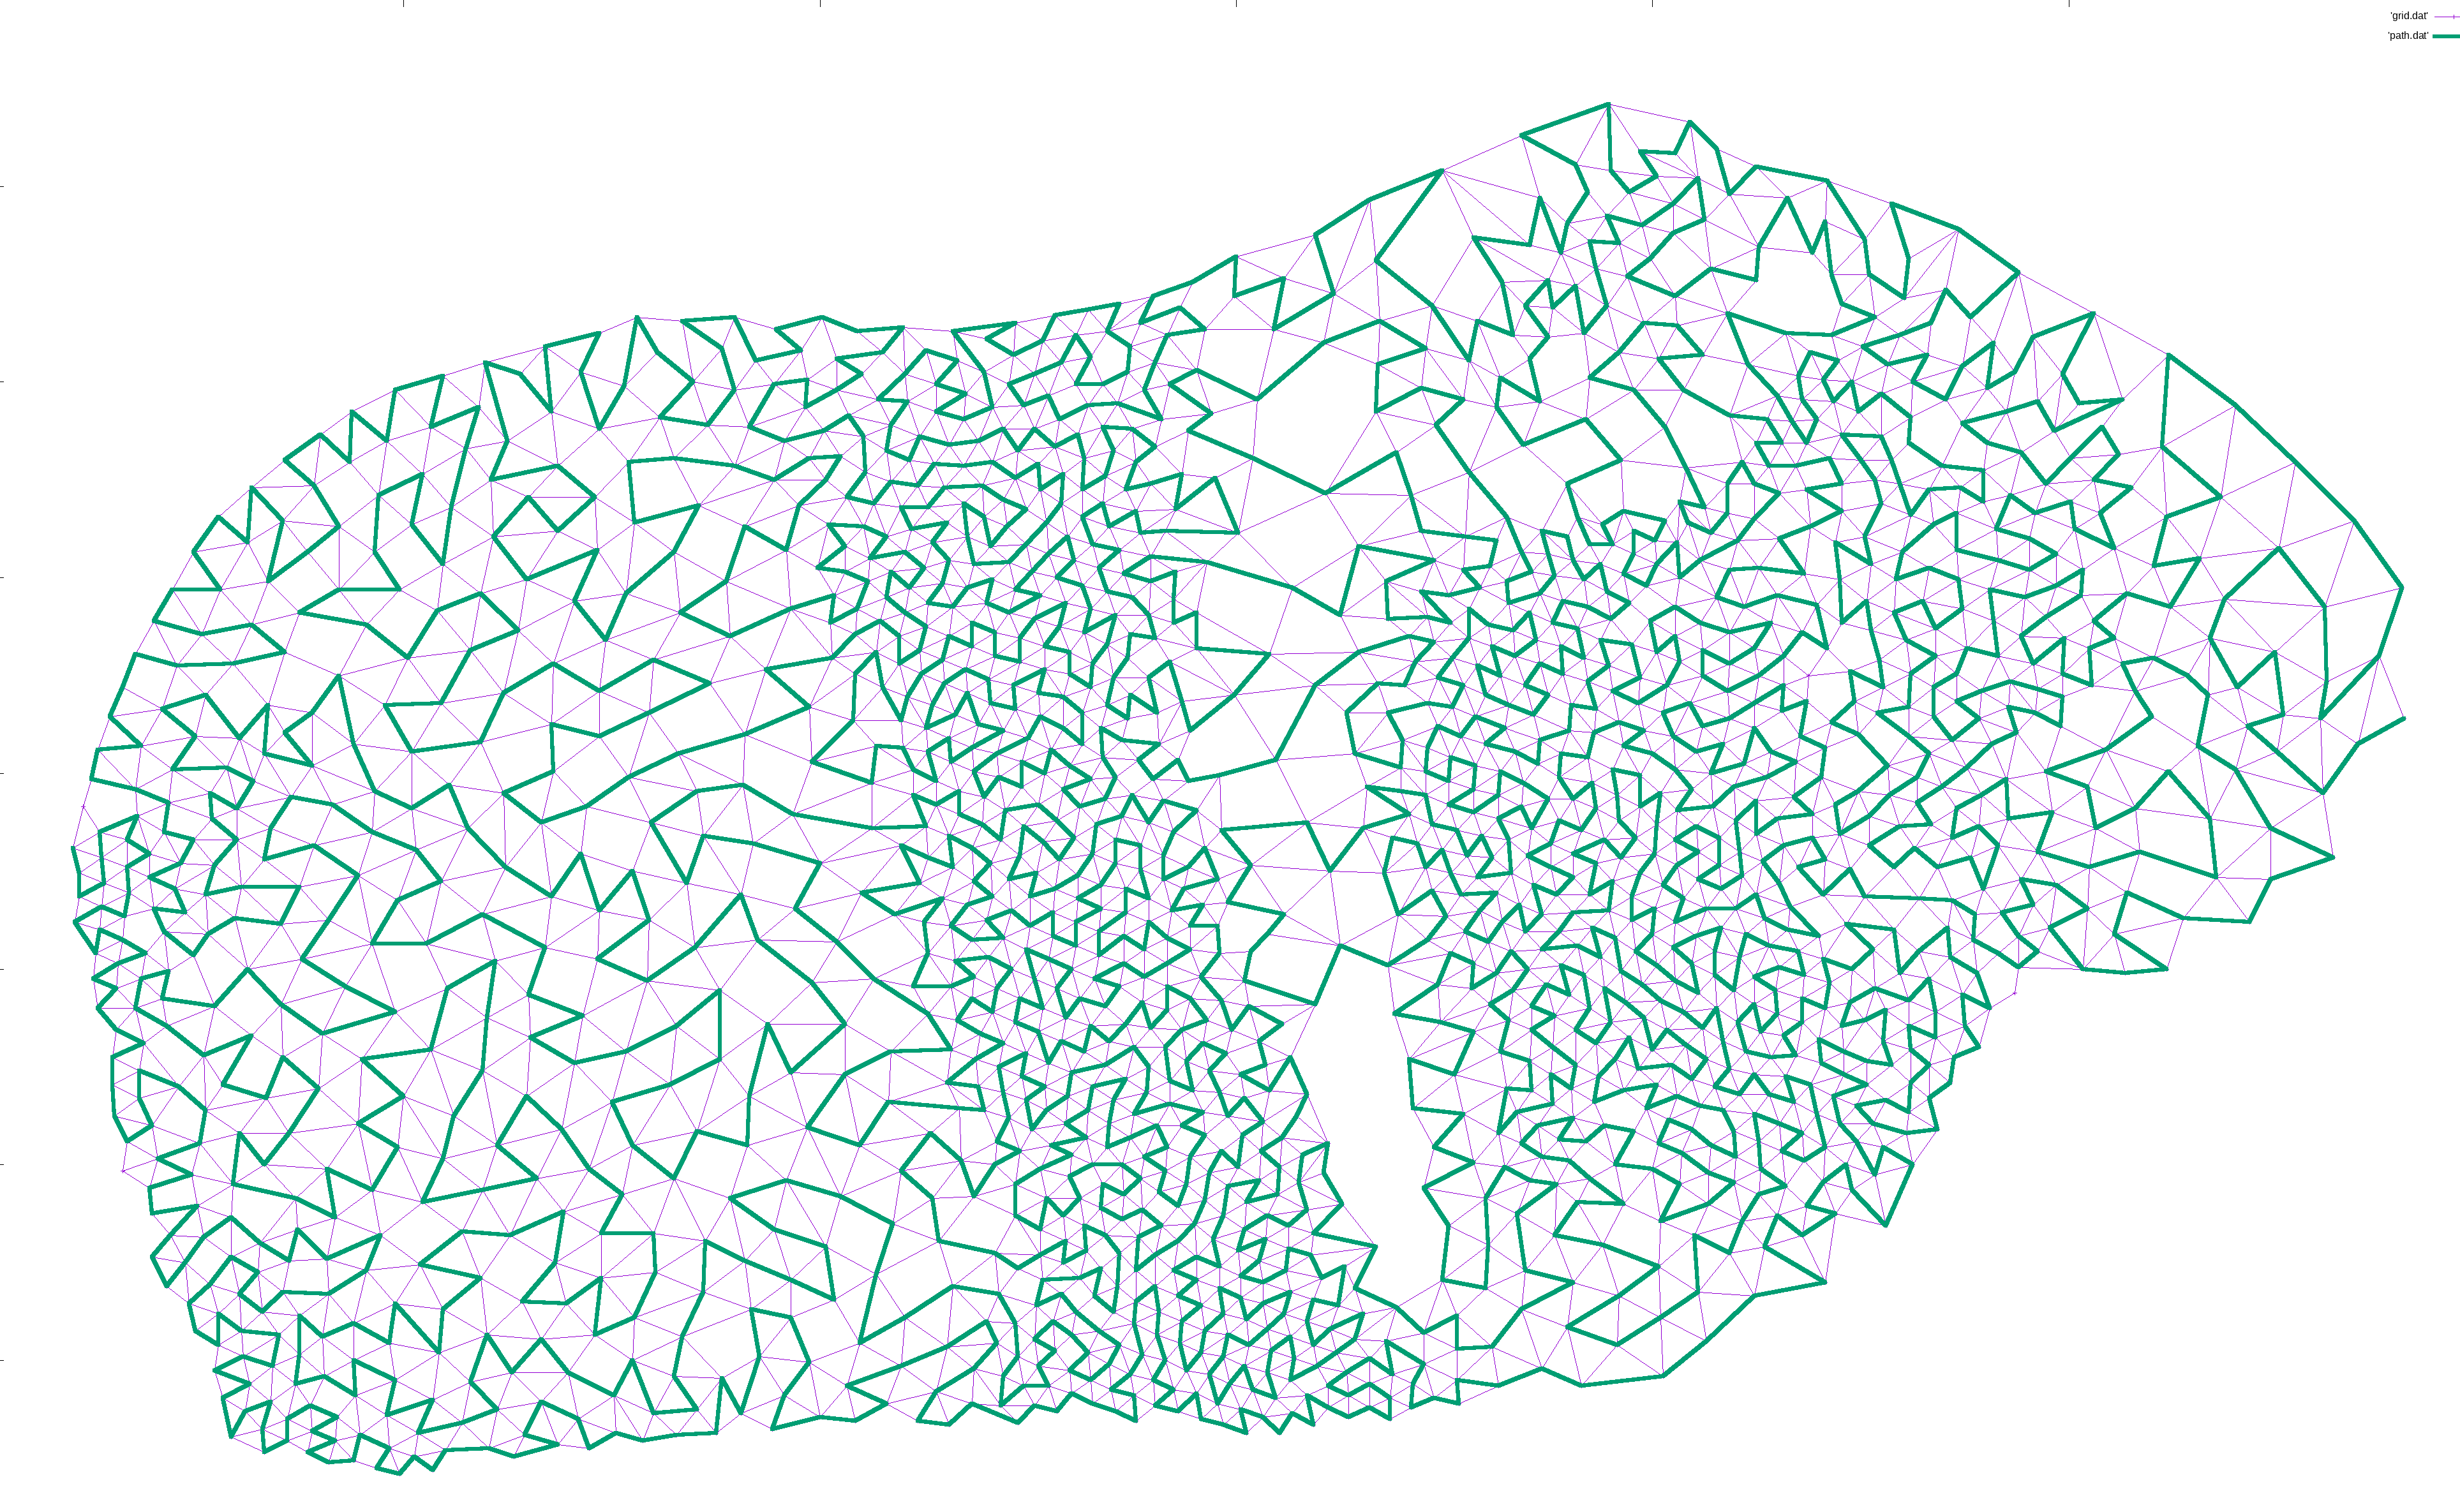
The line keeps getting longer!

A long meandering line now completely space filling the outline of a guinea pig

This is enough for well connected graphs.

For disjoint graphs, such as a world map, I simply added the shortest edge that would connect the disjoint regions together. This ensures that a path exists between the start and end, but necessarily leaves large island unconnected since there is only a single bridge there:

A world map with a line meandering from Alaska to New Zealand, but missing South America

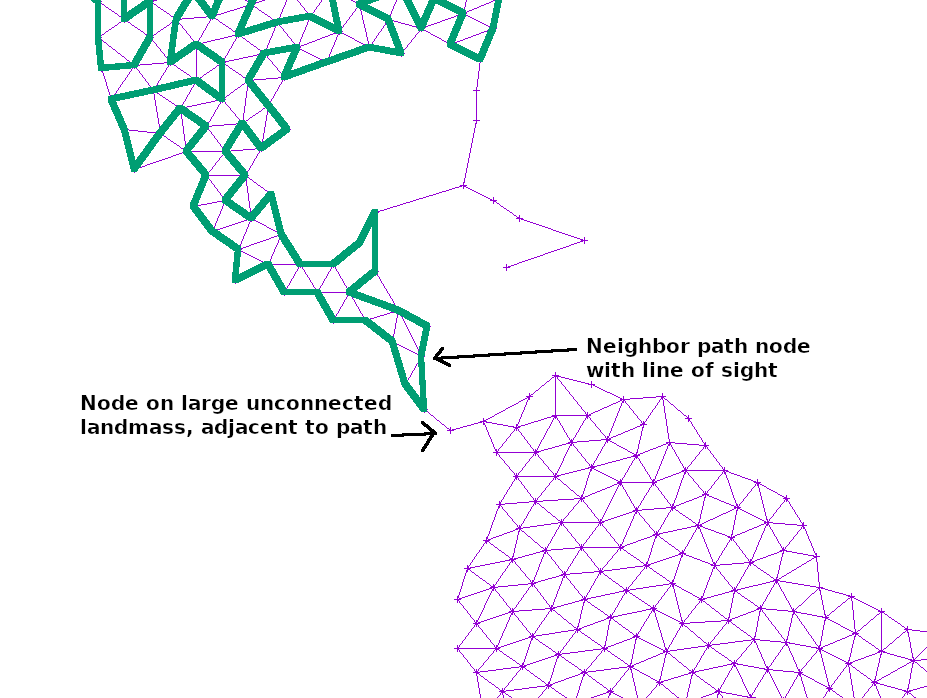
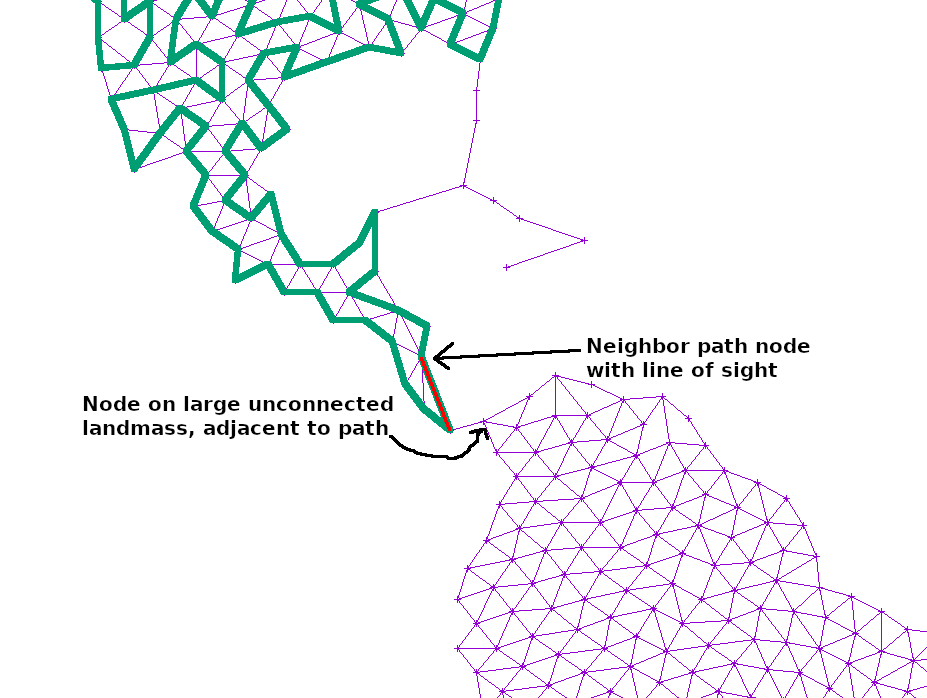
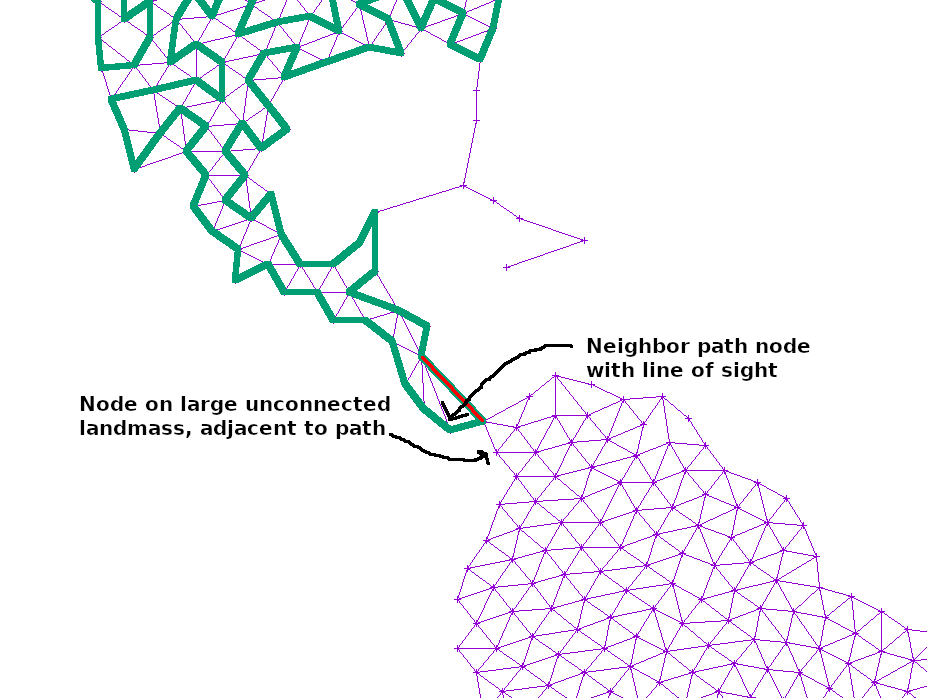
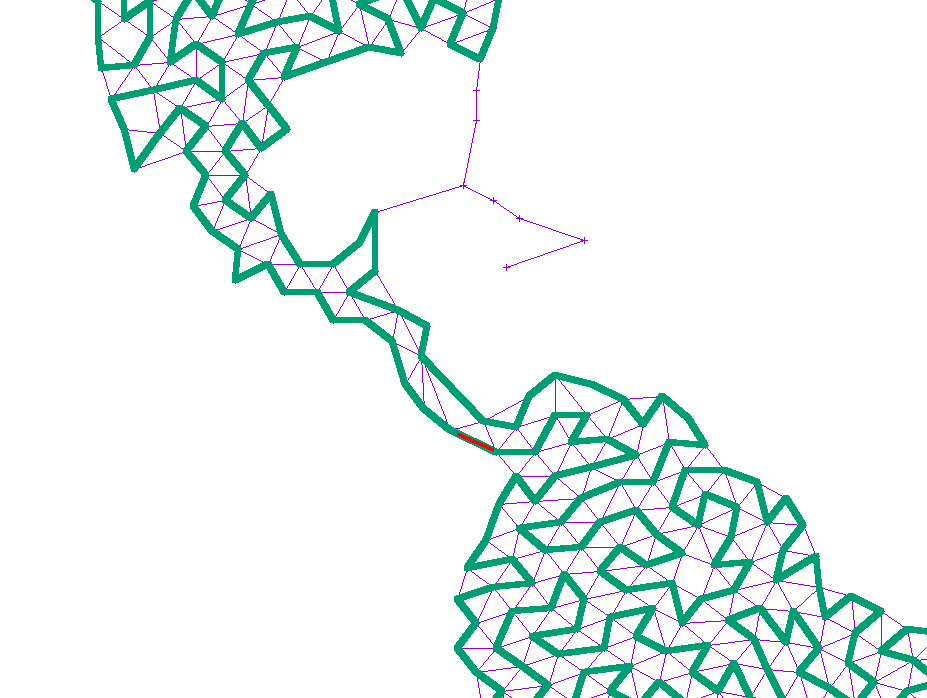
If the path at any point touched a large, unexplored section of the graph, I simply added another edge from the neighbor or neighbor’s neighor to that point. That way, any such island would slowly become reachable:

A path through Latin America, but stopping short of South America because the grid is only connected by a single edge

A path through Latin America, but stopping short of South America because the grid is only connected by a different, single edge, slightly closer to Colombia

A path through Latin America, now going down into Columbia and space filling all of South America

A path through Latin America, now going down into Columbia and space filling all of South America

Finally, the curve is smoothed from simple, linear segments into Catmull–Rom splines, and then mapped into Cubic Bezier splines that can easily be rendered in SVG.

There is some additional polish like ignoring areas under a certain size or that are just a long, thin line of points, shuffling to try to avoid holes in the middle of a graph, and pruning edges coming out of a single vertex that are too close in angle, but really — that’s it.

I had a lot of fun hacking this project together, and I still find the result fascinating and captivating. Give it a spin on FiniteCurve.com and see what you think!

(Thanks to gnuplot for its ever invaluable plots, both for debugging, and for the illustrations in this post)

Use echo/printf to write images in 5 LoC with zero libraries or headers

tl;dr: With the Netpbm file formats, it’s trivial to output pixels using nothing but text based IO

To show that there’s nothing up my sleeves, here’s an image:

A computer generated image of gently shaded, repeating squares

And here’s the complete, dependency free bash script that generates it:

#!/bin/bash
exec > my_image.ppm    # All echo statements will write here
echo "P3 250 250 255"  # magic, width, height, max component value
for ((y=0; y<250; y++)) {
  for ((x=0; x<250; x++)) {
    echo "$((x^y)) $((x^y)) $((x|y))" # r, g, b
  }
}

That’s it. That’s all you need to generate an image that can be read by common tools like GIMP, ImageMagick and Netpbm.

To rewind for a second, it’s sometimes useful to output an image to do printf debugging of 2D algorithms, to visualize data, or simply because you have some procedural pixels you want to put on screen.

However — at least if you hadn’t seen the above example — the threshold to start outputting graphics could seem rather high. Even with a single file library, that’s one more thing to set up and figure out. This is especially annoying during debugging, when you know you’re going to delete it within the hour.

Fortunately, the Netpbm suite of tools have developed an amazingly flexible solution: a set of lowest common denominator file formats for full color Portable PixMaps (PPM), Portable GrayMaps (PGM), and monochrome Portable BitMaps (PBM), that can all be written as plain ASCII text using any language’s basic text IO.

Collectively, the formats are known as PNM: Portable aNyMaps.

The above bash script is more than enough to get started, but a detailed description of the file format with examples can be found in man ppm, man pgm, and man pbm on a system with Netpbm installed.

Each man page describes two version of a simple file format: one binary and one ASCII. Either is completely trivial to implement, though the ASCII ones are my favorite for being so ridiculously barebones that you can write them by hand in Notepad.

To convert them to more common file formats, either open and export in GIMP, use ImageMagick convert my_file.ppm my_file.png, or NetPBM pnmtopng < my_file.ppm > my_file.png

Should you wish to input images using this trivial ASCII format, the NetPBM tool pnmtoplainpnm will convert a binary ppm/pgm/pbm (as produced by any tool including Netpbm’s anytopnm) into an ASCII ppm/pgm/pbm.

If your goal is to experiment with any kind of image processing algorithm, you can easily slot into Netpbm’s wonderfully Unix-y set of tools by reading/writing PPM on stdin/stdout:

curl http://example.com/input.png | 
    pngtopnm | 
    ppmbrighten -v +10 |
    yourtoolhere |
    pnmscale 2 |
    pnmtopng > output.png

Lessons learned from writing ShellCheck, GitHub’s now most starred Haskell project

ShellCheck is a static analysis tool that points out common problems and pitfalls in shell scripts.

As of last weekend it appears to have become GitHub’s most starred Haskell repository, after a mention in MIT SIPB’s Writing Safe Shell Scripts guide.

While obviously a frivolous metric in a niche category, I like to interpret this as meaning that people are finding ShellCheck as useful as I find Pandoc, the excellent universal document converter I use for notes, blog posts and ShellCheck’s man page, and which held a firm grip on the top spot for a long time.

I am very happy and humbled that so many people are finding the project helpful and useful. The response has been incredibly and overwhelmingly positive. Several times per week I see mentions from people who tried it out, and it either solved their immediate problem, or it taught them something new and interesting they didn’t know before.

I started the project 8 years ago, and this seems like a good opportunity to share some of the lessons learned along the way.

Quick History

ShellCheck is generally considered a shell script linter, but it actually started life in 2012 as an IRC bot (of all things!) on #bash@Freenode. It’s still there and as active as ever.

The channel is the home of the comprehensive and frequently cited Wooledge BashFAQ, plus an additional list of common pitfalls. Between them, they currently cover 178 common questions about Bash and POSIX sh.

Since no one ever reads the FAQ, an existing bot allowed regulars to e.g. answer any problem regarding variations of for file in `ls` with a simple !pf 1, and let a bot point the person in the right direction (the IRC equivalent of StackOverflow’s "duplicate of").

ShellCheck’s original purpose was essentially to find out how many of these FAQs could be classified automatically, without any human input.

Due to this, ShellCheck was designed for different goals than most linters.

  1. It would only run on buggy scripts, because otherwise they wouldn’t have been posted.
  2. It would only run once, and should be as helpful as possible on the first pass.
  3. It would run on my machine, not on arbitrary user’s systems.

This will become relevant.

On Haskell

Since ShellCheck was a hobby project that wasn’t intended to run on random people’s machines, I could completely ignore popularity, familiarity, and practicality, and pick the language that was the most fun and interesting.

That was, of course, Haskell.

As anyone who looks at code will quickly conclude, ShellCheck was my first real project in the language.

Some things worked really well:

  • QuickCheck has been beyond amazing. ShellCheck has 1500 unit tests just because they’re incredibly quick and convenient to write. It’s so good that I’m adding a subsection for it.
  • Parsec is a joy to write parsers in. Initially I dreaded e.g. implementing backticks because they require recursively re-invoking the parser on escaped string data, but every time I faced such issues, they turned out to be much easier than expected.
  • Haskell itself is a very comfy, productive language to write. It’s not at all arcane or restrictive as first impressions might have you believe. I’d take it over Java or C++ for most things.
  • Haskell is surprisingly portable. I was shocked when I discovered that people were running ShellCheck natively on Windows without problems. ARM required a few code changes at the time, but wouldn’t have today.

Some things didn’t work as well:

  • Haskell has an undeniably high barrier to entry for the uninitiated, and ShellCheck’s target audience is not Haskell developers. I think this has seriously limited the scope and number of contributions.
  • It’s easier to write than to run: it’s been hard to predict and control runtime performance. For example, many of ShellCheck’s check functions take an explicit "params" argument. Converting them to a cleaner ReaderT led to a 10% total run time regression, so I had to revert it. It makes me wonder about the speed penalty of code I designed better to begin with.
  • Controlling memory usage is also hard. I dropped multithreading support because I simply couldn’t figure out the space leaks.
  • For people not already invested in the ecosystem, the runtime dependencies can be 100MB+. ShellCheck is available as a standalone ~8MB executable, which took some work and is still comparatively large.
  • The Haskell ecosystem moves and breaks very quickly. New changes would frequently break on older platform versions. Testing the default platform version of mainstream distros in VMs was slow and tedious. Fortunately, Docker came along to make it easy to automate per-distro testing, and Stack brought reproducible Haskell builds.

If starting a new developer tooling project for a mainstream audience, I might choose a more mainstream language. I’d also put serious consideration into how well the language runs on a JSVM, since (love it or hate it) this would solve a lot of distribution, integration, and portability issues.

ShellCheck’s API is not very cohesive. If starting a new project in Haskell today, I would start out by implementing a dozen business logic functions in every part of the system in my best case pseudocode. This would help me figure out the kind of DSL I want, and help me develop a more uniform API on a suitable stack of monads.

Unit testing made fun and easy

ShellCheck is ~10k LoC, but has an additional 1.5k unit tests. I’m not a unit testing evangelist, 100% completionist or TDD fanatic: this simply happened by itself because writing tests was so quick and easy. Here’s an example check:

prop_checkSourceArgs1 = verify checkSourceArgs "#!/bin/sh\n. script arg"
prop_checkSourceArgs2 = verifyNot checkSourceArgs "#!/bin/sh\n. script"
prop_checkSourceArgs3 = verifyNot checkSourceArgs "#!/bin/bash\n. script arg"
checkSourceArgs = CommandCheck (Exactly ".") f
  where
f t = whenShell [Sh, Dash] $
    case arguments t of
	(file:arg1:_) -> warn (getId arg1) 2240 $
	    "The dot command does not support arguments in sh/dash. Set them as variables."
	_ -> return ()

The prop_.. lines are individual unit tests. Note in particular that:

  • Each test simply specifies whether the given check emits a warning for a snippet. The boilerplate fits on the same line
  • The test is in the same file and place as the function, so it doesn’t require any cross-referencing
  • It doubles as a doc comment that explains what the function is expected to trigger on
  • checkSourceArgs is in OO terms an unexposed private method, but no OO BS was required to "expose it for testing"

Even the parser has tests like this, where it can check whether a given function parses the given string cleanly or with warnings.

QuickCheck is better known for its ability to generate test cases for invariants, which ShellCheck makes some minimal use of, but even without that I’ve never had a better test writing experience in any previous project of any language.

On writing a parser

ShellCheck was the first real parser I ever wrote. I’ve since taken up a day job as a compiler engineer, which helps to put a lot of it into perspective.

My most important lessons would be:

  • Be careful if your parser framework makes it too easy to backtrack. Look up good parser design. I naively wrote a character based parser function for each construct like ${..}, $(..), $'..', etc, and now the parser has to backtrack a dozen times to try every possibility when it hits a $. With a tokenizer or a parser that read $ followed by {..}, (..) etc, it would have been much faster — in fact, just grouping all the $ constructs behind a lookahead decreased total checking time by 10%.
  • Consistently use a tab stop of 1 for all column counts. This is what e.g. GCC does, and it makes life easier for everyone involved. ShellCheck used Parsec’s default of 8, which has been a source of alignment bugs and unnecessary conversions ever since.
  • Record the full span and not just the start index of your tokens. Everyone loves squiggly lines under bad code. Also consider whether you want to capture comments and whitespace so you can turn the AST back into a script for autofixing. ShellCheck retrofitted end positions and emits autofixes as a series of text edits based on token spans, and it’s neither robust nor convenient.

ShellCheck’s parser has historically also been, let’s say, "pragmatic". For example, shell scripts are case sensitive, but ShellCheck accepted While in place of while for loops.

This is generally considered heresy, but it originally made sense when ShellCheck needed to be as helpful as possible on the first try for a known buggy script. Neither ShellCheck nor a human would not point out that While sleep 1; do date; done has a misplaced do and done, but most linters would since While is not considered a valid start of a loop.

These days it not as useful, since any spurious warnings about do would disappear when the user fixed the warning for While and reran ShellCheck.

It also gets in the way for advanced users who e.g. write a function called While and capitalized it that way because they don’t want it treated as a shell keyword. ShellCheck has rightly received some critisism for focusing too much on newbie mistakes at the expense of noise for advanced users. This is an active area of development.

If designed again, ShellCheck would parse more strictly according to spec, and instead make liberal use of lookaheads with pragmatic interpretations to emit warnings, even if it often resulted in a single useful warning at a time.

On writing a static analysis tool

I hadn’t really pondered, didn’t really use, and definitely hadn’t written any static analysis or linting tools before. The first versions of ShellCheck didn’t even have error codes, just plain English text befitting an IRC bot.

  • Supplement terse warnings with a wiki/web page. ShellCheck’s wiki has a page for each warning, like SC2162. It has an example of code that triggers, an example of a fix, a mention of cases where it may not apply, and has especially received a lot of praise for having an educational rationale explaining why this is worth fixing.
  • You’re not treading new ground. There are well studied algorithms for whatever you want to do. ShellCheck has some simplistic ad-hoc algorithms for e.g. variable liveness, which could and should have been implemented using robust and well known techniques.
  • If designed today with 20/20 hindsight, ShellCheck would have a plan to work with (or as) a Language Server to help with editor integrations.
  • Include simple ways to suppress warnings. Since ShellCheck was originally intended for one-shot scenarios, this was an afterthought. It was then added on a statement level where the idea was that you could put special comments in front of a function, loop, or regular command, and it would apply to the entire thing. This has been an endless source of confusion (why can’t you put it in front of a case branch?), and should have been done on a per-line level instead.
  • Give tests metadata so you can filter them. ShellCheck’s original checks were simple functions invoked for each AST node. Some of them only applied to certain shells, but would still be invoked thousands of times just to check that they don’t apply and return. Command specific checks would all duplicate and repeat the work of determining whether the current node was a command, and whether it was the command. Disabled checks were all still run, and their hard work simply filtered out afterwards. With more metadata, these could have been more intelligently applied.
  • Gather a test corpus! Examining the diff between runs on a few thousand scripts has been invaluable in evaluating the potential, true/false positive rate, and general correctness of checks.
  • Track performance. I simply added time output to the aforementioned diff, and it stopped several space leaks and quadratic explosions.

For a test corpus, I set up one script to scrape pastebin links from #bash@Freenode, and another to scrape scripts from trending GitHub projects.

The pastebin links were more helpful because they exactly represented the types of scripts that ShellCheck wanted to check. However, though they’re generally simple and posted publically, I don’t actually have any rights to redistribute them, so I can’t really publish them to allow people to test their contributions.

The GitHub scripts are easier to redistribute since there’s provenance and semi-structured licensing terms, but they’re generally also less buggy and therefore less useful (except for finding false positives).

Today I would probably have tried parsing the Stack Exchange Data Dump instead.

Finally, ShellCheck is generally reluctant to read arbitrary files (e.g. requiring a flag -x to follow included scripts). This is obviously because it was first a hosted service on IRC and web before containerization was made simple, and not because this is in any way helpful or useful for a local linter.

On having a side project while working at a large company

I worked at Google when I started ShellCheck. They were good sports about it, let me run the project and keep the copyright, as long as I kept it entirely separate from my day job. I later joined Facebook, where the policies were the same.

Both companies independently discovered and adopted ShellCheck without my input, and the lawyers stressed the same points:

  • The company must not get, or appear to get, any special treatment because of you working there. For example, don’t prioritize bugs they find.
  • Don’t contribute to anything related to the project internally. Not even if it’s work related. Not even if it’s not. Not even on your own time.
  • If anyone assigns you a related internal task/bug, reject it and tell them they’ll have to submit a FOSS bug report.

And after discovering late in the interview process that Apple has a blanket ban on all programming related hobby projects:

  • Ask any potential new employer about their side project policy early on

On the name "ShellCheck"

I just thought it was a descriptive name with a cute pun. I had no idea that a portion of the population would consistently read "SpellCheck" no matter how many times they saw it. Sorry for the confusion!

So what exactly is -ffunction-sections and how does it reduce binary size?

If you’d like a more up-to-date version of ShellCheck than what Raspbian provides, you can build your own on a Raspberry Pi Zero in a little over 21 hours.

Alternatively, as of last week, you can also download RPi compatible, statically linked armv6hf binaries of every new commit and stable release.

It’s statically linked — i.e. the executable has all its library dependencies built in — so you can expect it to be pretty big. However, I didn’t expect it to be 67MB:

build@d1044ff3bf67:/mnt/shellcheck# ls -l shellcheck
-rwxr-xr-x 1 build build 66658032 Jul 14 16:04 shellcheck

This is for a tool intended to run on devices with 512MiB RAM. strip helps shed a lot of that weight, and the post-stripped number is the one we’ll use from now on, but 36MB is still more than I expected, especially given that the x86_64 build is 23MB.

build@d1044ff3bf67:/mnt/shellcheck# strip --strip-all shellcheck
build@d1044ff3bf67:/mnt/shellcheck# ls -l shellcheck
-rwxr-xr-x 1 build build 35951068 Jul 14 16:22 shellcheck

So now what? Optimize for size? Here’s ghc -optlo-Os to enable LLVM opt size optimizations, including a complete three hour Qemu emulated rebuild of all dependencies:

build@31ef6588fdf1:/mnt/shellcheck# ls -l shellcheck
-rwxr-xr-x 1 build build 32051676 Jul 14 22:38 shellcheck

Welp, that’s not nearly enough.

The real problem is that we’re linking in both C and Haskell dependencies, from the JSON formatters and Regex libraries to bignum implemenations and the Haskell runtime itself. These have tons of functionality that ShellCheck doesn’t use, but which is still included as part of the package.

Fortunately, GCC and GHC allow eliminating this kind of dead code through function sections. Let’s look at how that works, and why dead code can’t just be eliminated as a matter of course:

An ELF binary contains a lot of different things, each stored in a section. It can have any number of these sections, each of which has a pile of attributes including a name:

  • .text stores executable code
  • .data stores global variable values
  • .symtab stores the symbol table
  • Ever wondered where compilers embed debug info? Sections.
  • Exception unwinding data, compiler version or build IDs? Sections.

This is how strip is able to safely and efficiently drop so much data: if a section has been deemed unnecessary, it’s simple and straight forward to drop it without affecting the rest of the executable.

Let’s have a look at some real data. Here’s a simple foo.c:

int foo() { return 42; }
int bar() { return foo(); }

We can compile it with gcc -c foo.c -o foo.o and examine the sections:

$ readelf -a foo.o
ELF Header:
  Magic:   7f 45 4c 46 01 01 01 00 00 00 00 00 00 00 00 00
  Class:        ELF32
  Data:         2's complement, little endian
  Version:      1 (current)
  OS/ABI:       UNIX - System V
  ABI Version:  0
  Type:         REL (Relocatable file)
  Machine:      ARM
[..]

Section Headers:
  [Nr] Name       Type      Addr   Off    Size   ES Flg Lk Inf Al
  [ 0]            NULL      000000 000000 000000 00      0   0  0
  [ 1] .text      PROGBITS  000000 000034 000034 00  AX  0   0  4
  [ 2] .rel.text  REL       000000 000190 000008 08   I  8   1  4
  [ 3] .data      PROGBITS  000000 000068 000000 00  WA  0   0  1
  [ 4] .bss       NOBITS    000000 000068 000000 00  WA  0   0  1
  [..]

Symbol table '.symtab' contains 11 entries:
   Num:    Value  Size Type    Bind   Vis      Ndx Name
   [..]
     9: 00000000    28 FUNC    GLOBAL DEFAULT    1 foo
    10: 0000001c    24 FUNC    GLOBAL DEFAULT    1 bar

There’s tons more info not included here, and it’s an interesting read in its own right. Anyways, both our functions live in the .text segment. We can see this from the symbol table’s Ndx column which says section 1, corresponding to .text. We can also see it in the disassembly:

$ objdump -d foo.o
foo.o:     file format elf32-littlearm

Disassembly of section .text:
00000000 <foo>:
   0:   e52db004   push    {fp}
   4:   e28db000   add     fp, sp, #0
   8:   e3a0302a   mov     r3, #42 ; 0x2a
   c:   e1a00003   mov     r0, r3
  10:   e28bd000   add     sp, fp, #0
  14:   e49db004   pop     {fp}
  18:   e12fff1e   bx      lr

0000001c <bar>:
  1c:   e92d4800   push    {fp, lr}
  20:   e28db004   add     fp, sp, #4
  24:   ebfffffe   bl      0 <foo>
  28:   e1a03000   mov     r3, r0
  2c:   e1a00003   mov     r0, r3
  30:   e8bd8800   pop     {fp, pc}

Now lets say that the only library function we use is foo, and we want bar removed from the final binary. This is tricky, because you can’t just modify a .text segment by slicing things out of it. There are offsets, addresses and cross-dependencies compiled into the code, and any shifts would mean trying to patch that all up. If only it was as easy as when strip removed whole sections…

This is where gcc -ffunction-sections and ghc -split-sections come in. Let’s recompile our file with gcc -ffunction-sections foo.c -c -o foo.o:

$ readelf -a foo.o
[..]
Section Headers:
  [Nr] Name          Type      Addr  Off  Size ES Flg Lk Inf Al
  [ 0]               NULL      00000 0000 0000 00      0   0  0
  [ 1] .text         PROGBITS  00000 0034 0000 00  AX  0   0  1
  [ 2] .data         PROGBITS  00000 0034 0000 00  WA  0   0  1
  [ 3] .bss          NOBITS    00000 0034 0000 00  WA  0   0  1
  [ 4] .text.foo     PROGBITS  00000 0034 001c 00  AX  0   0  4
  [ 5] .text.bar     PROGBITS  00000 0050 001c 00  AX  0   0  4
  [ 6] .rel.text.bar REL       00000 01c0 0008 08   I 10   5  4
  [..]

Symbol table '.symtab' contains 14 entries:
   Num:    Value  Size Type    Bind   Vis      Ndx Name
[..]
12: 00000000    28 FUNC    GLOBAL DEFAULT    4 foo
13: 00000000    28 FUNC    GLOBAL DEFAULT    5 bar

Look at that! Each function now has its very own section.

This means that a linker can go through and find all the sections that contain symbols we need, and drop the rest. We can enable it with the aptly named ld flag --gc-sections. You can pass that flag to ld via gcc using gcc -Wl,--gc-sections. And you can pass that whole thing to gcc via ghc using ghc -optc-Wl,--gc-sections

I enabled all of this in my builder’s .cabal/config:

program-default-options
  gcc-options: -Os -Wl,--gc-sections -ffunction-sections -fdata-sections
  ghc-options: -optc-Os -optlo-Os -split-sections

With this in place, the ShellCheck binary became a mere 14.5MB:

-rw-r--r-- 1 build build 14503356 Jul 15 10:01 shellcheck

That’s less than half the size we started out with. I’ve since applied the same flags to the x86_64 build, which brought it down from 23MB to 7MB. Snappier downloads and installs for all!


For anyone interested in compiling Haskell for armv6hf on x86_64, I spent weeks trying to get cross-compilation going, but in the end (and with many hacks) I was only able to cross-compile armv7. In the end I gave up and took the same approach as with the Windows build blog post: a Docker image runs the Raspbian armv6 userland in Qemu user emulation mode.

I didn’t even have to set up Qemu. There’s tooling from Resin.io for building ARM Docker containers for IoT purposes. ShellCheck (ab)uses this to run emulated GHC and cabal. Everything Just Works, if slowly.

The Dockerfile is available on GitHub as koalaman/armv6hf-builder.