Swap on HDD: Does placement matter? (tl;dr: Yes)

Someone was partitioning an ancient laptop’s spinning rust, and asked where they should put their swap. At the start of the drive? At the end? As a swap file? Does it even matter?

While I’m on my 4th generation SSD at this point, I was interested enough to benchmark and find out. I would have used a swap file thinking it wouldn’t matter much, but boy was I wrong!

Test setup

My only remaining functional HDD — after putting two others in the electronics recycling bin — was a Western Digital 2.0TB WD20EARX SATA drive with 64MB cache.

I installed Ubuntu 21.04 Server on it, and partitioned it with 1G boot, 4G swap, 1.8T ext4 root, and another 4G swap. For easy testing, I did it all through kvm using the raw device without cache:

kvm -m 2048 -drive file=/dev/sda,format=raw,cache=none

I verified that the host did indeed not use its rather more generous RAM to cache the device.

The standard test, building Linux, did not swap as much as I hoped. With enough RAM to successfully boot, it didn’t really touch swap for as long as I bothered to watch it. I instead turned to my favorite RAM hog: building ShellCheck with the GHC Haskell compiler. This is a high RAM, low disk process.

I tried once with plenty of RAM, then each of the following with 2GB RAM and 4GB swap:

  • Swap at the start of the drive
  • Swap at the end of the drive
  • Swap in a file created with dd if=/dev/zero of=4g bs=1M count=4096 (which hdparm --fibmap revealed to be allocated across four contiguous areas in the first 14GB of the device)

For fun, I also included:

  • Swap on an old OCZ Vertex 4 SATA 256GB SSD
  • Swap on my current Samsung 970 Evo Plus 1TB SSD

Each test was preceded by a git clean -fdx, swapoff/swapon, dropping caches, and finally a time cabal v1-build shellcheck.

I ran each test twice and picked the lowest number, though the variance was not large. For the swap file, I generated a second one to see if it was the luck of the allocator, but results were similar. dmesg showed no read errors after the tests finished.

Results

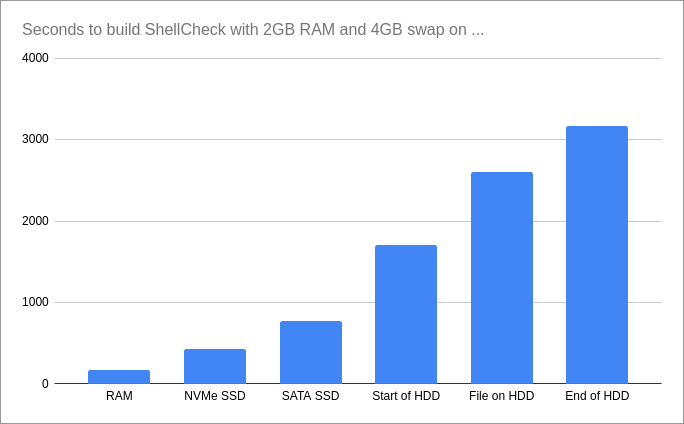
Bar chart of numbers below

Or in numbers:

  • 165s (2:45) — RAM only
  • 451s (7:31) — NVMe SSD
  • 771s (12:51) — SATA SSD
  • 1701s (28:21) — Start of HDD
  • 2600s (43:20) — Swap file on HDD
  • 3161s (52:41) — End of HDD

In this test, using a swap file was surprisingly 50%+ slower than simply allocating a swap partition at the start of the drive, in spite of the low fragmentation and Linux’s bypass of the FS layer.

Drives and workloads obviously vary, but if nothing else we can safely say that yes, placement matters.

Why is /usr/bin/test 4kiB smaller than /usr/bin/[ ?

Reddit user mathisweirdaf posted this interesting observation:

 $ ls -lh /usr/bin/{test,[}
-rwxr-xr-x 1 root root 59K  Sep  5  2019 '/usr/bin/['
-rwxr-xr-x 1 root root 55K  Sep  5  2019  /usr/bin/test

[ and test are supposed to be aliases for each other, and yet there is a 4kiB difference between their GNU coreutils binaries. Why?

First, for anyone surprised: yes, there is a /usr/bin/[. I have a previous post on this subject, but here’s a quick recap:

When you write if [ -e /etc/passwd ]; then .. that bracket is not shell syntax but just a regular command with a funny name. It’s serviced by /usr/bin/[, or (more likely) a shell builtin. This explains a lot of its surprising behavior, e.g. why it’s notoriously space sensitive: [1=2] is no more valid than ls-l/tmp.

Anyways, why is there a size difference? We can compare objdump output to see where the data goes. Here’s an excerpt from objdump -h /usr/bin/[:

                 size                                          offset
15 .text         00006e82  0000000000002640  0000000000002640  00002640  2**4
16 .fini         0000000d  00000000000094c4  00000000000094c4  000094c4  2**2
17 .rodata       00001e4c  000000000000a000  000000000000a000  0000a000  2**5

and here’s objdump -h /usr/bin/test:

15 .text         000068a2  0000000000002640  0000000000002640  00002640  2**4
16 .fini         0000000d  0000000000008ee4  0000000000008ee4  00008ee4  2**2
17 .rodata       00001aec  0000000000009000  0000000000009000  00009000  2**5

We can see that the .text segment (compiled executable code) — is 1504 bytes larger, while .rodata (constant values and strings) is 864 bytes larger.

Most crucially, the increased size of the .text segment causes it to go from the 8000s to the 9000s, crossing a 0x1000 (4096) page size boundary, and therefore shifting all other segments up by 4096 bytes. This is the size difference we’re seeing.

The only nominal difference between [ and test is that [ requires a ] as a final argument. Checking for that would be a very minuscule amount of code, so what are those ~1500 bytes used for?

Since it’s hard to inspect stripped binaries, I built my own copy of coreutils and compared the list of functions in each:

$ diff -u <(nm -S --defined-only src/[ | cut -d ' ' -f 2-) <(nm -S --defined-only src/test | cut -d ' ' -f 2-)
--- /dev/fd/63      2021-02-02 20:21:35.337942508 -0800
+++ /dev/fd/62      2021-02-02 20:21:35.341942491 -0800
@@ -37,7 +37,6 @@
 D __dso_handle
 d _DYNAMIC
 D _edata
-0000000000000099 T emit_bug_reporting_address
 B _end
 0000000000000004 D exit_failure
 0000000000000008 b file_name
@@ -63,7 +62,7 @@
 0000000000000022 T locale_charset
 0000000000000014 T __lstat
 0000000000000014 t lstat
-0000000000000188 T main
+00000000000000d1 T main
 000000000000000b T make_timespec
 0000000000000004 d nslots
 0000000000000022 t one_argument
@@ -142,16 +141,10 @@
 0000000000000032 T umaxtostr
 0000000000000013 t unary_advance
 00000000000004e5 t unary_operator
-00000000000003d2 T usage
+0000000000000428 T usage
 0000000000000d2d T vasnprintf
 0000000000000013 T verror
 00000000000000ae T verror_at_line
-0000000000000008 D Version
-00000000000000ab T version_etc
-0000000000000018 T version_etc_ar
-000000000000042b T version_etc_arn
-000000000000002f R version_etc_copyright
-000000000000007a T version_etc_va
 000000000000001c r wide_null_string.2840
 0000000000000078 T x2nrealloc
 000000000000000e T x2realloc

The major contributors are the version_etc* functions. What do they do?

Well, let’s have a look:

/* The three functions below display the --version information the
   standard way. [...]

These are 260 lines of rather elaborate, internationalized, conditional ways of formatting data that makes up --version output. Together they take about bc <<< "ibase=16; 7A+2F+42B+18+AB+8+99" = 1592 bytes.

What does this mean? Simple. This is what we’re paying an extra 4kb for:

$ /usr/bin/[ --version
[ (GNU coreutils) 8.30
Copyright (C) 2018 Free Software Foundation, Inc.
License GPLv3+: GNU GPL version 3 or later <https://gnu.org/licenses/gpl.html>.
This is free software: you are free to change and redistribute it.
There is NO WARRANTY, to the extent permitted by law.

Written by Kevin Braunsdorf and Matthew Bradburn.

[ --version is missing the final ], so the invocation is invalid and the result is therefore implementation defined. GNU is free to let it output version info.

Meanwhile, /usr/bin/test --version is a valid invocation, and POSIX mandates that it simply returns success when the first parameter (--version) is a non-empty string.

This difference is even mentioned in the documentation:

NOTE: [ honors the --help and --version options, but test does not.
test treats each of those as it treats any other nonempty STRING.

Mystery solved!

(Exercise: what would have been the implications of having test support --help and --version in spite of POSIX?)

Use echo/printf to write images in 5 LoC with zero libraries or headers

tl;dr: With the Netpbm file formats, it’s trivial to output pixels using nothing but text based IO

To show that there’s nothing up my sleeves, here’s an image:

A computer generated image of gently shaded, repeating squares

And here’s the complete, dependency free bash script that generates it:

#!/bin/bash
exec > my_image.ppm    # All echo statements will write here
echo "P3 250 250 255"  # magic, width, height, max component value
for ((y=0; y<250; y++)) {
  for ((x=0; x<250; x++)) {
    echo "$((x^y)) $((x^y)) $((x|y))" # r, g, b
  }
}

That’s it. That’s all you need to generate an image that can be read by common tools like GIMP, ImageMagick and Netpbm.

To rewind for a second, it’s sometimes useful to output an image to do printf debugging of 2D algorithms, to visualize data, or simply because you have some procedural pixels you want to put on screen.

However — at least if you hadn’t seen the above example — the threshold to start outputting graphics could seem rather high. Even with a single file library, that’s one more thing to set up and figure out. This is especially annoying during debugging, when you know you’re going to delete it within the hour.

Fortunately, the Netpbm suite of tools have developed an amazingly flexible solution: a set of lowest common denominator file formats for full color Portable PixMaps (PPM), Portable GrayMaps (PGM), and monochrome Portable BitMaps (PBM), that can all be written as plain ASCII text using any language’s basic text IO.

Collectively, the formats are known as PNM: Portable aNyMaps.

The above bash script is more than enough to get started, but a detailed description of the file format with examples can be found in man ppm, man pgm, and man pbm on a system with Netpbm installed.

Each man page describes two version of a simple file format: one binary and one ASCII. Either is completely trivial to implement, though the ASCII ones are my favorite for being so ridiculously barebones that you can write them by hand in Notepad.

To convert them to more common file formats, either open and export in GIMP, use ImageMagick convert my_file.ppm my_file.png, or NetPBM pnmtopng < my_file.ppm > my_file.png

Should you wish to input images using this trivial ASCII format, the NetPBM tool pnmtoplainpnm will convert a binary ppm/pgm/pbm (as produced by any tool including Netpbm’s anytopnm) into an ASCII ppm/pgm/pbm.

If your goal is to experiment with any kind of image processing algorithm, you can easily slot into Netpbm’s wonderfully Unix-y set of tools by reading/writing PPM on stdin/stdout:

curl http://example.com/input.png | 
    pngtopnm | 
    ppmbrighten -v +10 |
    yourtoolhere |
    pnmscale 2 |
    pnmtopng > output.png

An ode to pack: gzip’s forgotten decompressor

The latest 4.13.9 source release of the Linux kernel is 780MiB, but thanks to xz compression, the download is a much more managable 96 MiB (an 88% reduction)

Before xz took over as the default compression format on kernel.org in 2013, following the "latest" link would have gotten you a bzip2 compressed file. The tar.bz2 would have been 115 MiB (-85%), but there’s was no defending the extra 20 MiB after xz caught up in popularity. bzip2 is all but displaced today.

bzip2 became the default in 2003, though it had long been an option over the less efficient gzip. However, since every OS, browser, language core library, phone and IoT lightswitch has built-in support for gzip, a 148 MiB (-81%) tar.gz remains an option even today.

gzip itself started taking over in 1994, before kernel.org, and before the World Wide Web went mainstream. It must have been a particularly easy sell for the fledgeling Linux kernel: it was made, used and endorsed by the mighty GNU project, it was Free Software, free of patent restrictions, and it provided powerful .zip style DEFLATE compression in a Unix friendly package.

Another nice benefit was that gzip could decompress other contemporary formats, thereby replacing contested and proprietary software.

Among the tools it could replace was compress, the de-facto Unix standard at the time. Created based on LZW in 1985, it was hampered by the same patent woes that plagued GIF files. The then-ubiquitous .Z suffix graced the first public Linux releases, but is now recognized only by the most long-bearded enthusiasts. The current release would have been 302 MiB (-61%) with compress.

Another even more obscure tool it could replace was compress‘s own predecessor, pack. This rather loosely defined collection of only partially compatible formats is why compress had to use a capital Z in its extension. pack came first, and offered straight Huffman coding with a .z extension.

With pack, our Linux release would have been 548 MiB (-30%). Compared to xz‘s 96 MiB, it’s obvious why no one has used it for decades.

Well, guess what: gzip never ended its support! Quoth the man page,

gunzip can currently decompress files created by gzip, zip,
compress, compress -H or pack.

While multiple implementations existed, these were common peculiarities:

  • They could not be used in pipes.
  • They could not represent empty files.
  • They could not compress a file with only one byte value, e.g. "aaaaaa…"
  • They could fail on "large" files. "can’t occur unless [file size] >= [16MB]", a comment said dismissively, from the time when a 10MB hard drive was a luxury few could afford.

These issues stemmed directly from the Huffman coding used. Huffman coding, developed in 1952, is basically an improvement on Morse code, where common characters like "e" get a short code like "011", while uncommon "z" gets a longer one like "111010".

  • Since you have to count the characters to figure out which are common, you can not compress in a single pass in a pipe. Now that memory is cheap, you could mostly get around that by keeping the data in RAM.

  • Empty files and single-valued files hit an edge case: if you only have a single value, the shortest code for it is the empty string. Decompressors that didn’t account for it would get stuck reading 0 bits forever. You can get around it by adding unused dummy symbols to ensure a minimum bit length of 1.

  • A file over 16MB could cause a single character to be so rare that its bit code was 25+ bits long. A decompressor storing the bits to be decoded in a 32bit value (a trick even gzip uses) would be unable to append a new 8bit byte to the buffer without displacing part of the current bit code. You can get around that by using "package merge" length restricted prefix codes over naive Huffman codes.

I wrote a Haskell implementation with all these fixes in place: koalaman/pack is available on GitHub.

During development, I found that pack support in gzip had been buggy since 2012 (version 1.6), but no one had noticed in the five years since. I tracked down the problem and I’m happy to say that version 1.9 will again restore full pack support!

Anyways, what could possibly be the point of using pack today?

There is actually one modern use case: code golfing.

This post came about because I was trying to implement the shortest possible program that would output a piece of simple ASCII art. A common trick is variations of a self-extracting shell script:

sed 1d $0|gunzip;exit
<compressed binary data here>

You can use any available compressor, including xz and bzip2, but these were meant for bigger files and have game ruining overheads. Here’s the result of compressing the ASCII art in question:

  • raw: 269 bytes
  • xz: 216 bytes
  • bzip2: 183 bytes
  • gzip: 163 bytes
  • compress: 165 bytes
  • and finally, pack: 148 bytes!

I was able to save 15 bytes by leveraging gzip‘s forgotten legacy support. This is huge in a sport where winning entries are bytes apart.

Let’s have a look at this simple file format. Here’s an example pack file header for the word "banana":

1f 1e        -- Two byte magic header
00 00 00 06  -- Original compressed length (6 bytes)

Next comes the Huffman tree. Building it is simple to do by hand, but too much for this post. It just needs to be complete, left-aligned, with eof on the right at the deepest level. Here’s the optimal tree for this string:

        /\
       /  a
      /\
     /  \
    /\   n
   b  eof

We start by encoding its depth (3), and the number of leaves on each level. The last level is encoded minus 2, because the lowest level will have between 2 and 257 leaves, while a byte can only store 0-255.

03  -- depth
01  -- level 1 only contains 'a'
01  -- level 2 only contains 'n'
00  -- level 3 contains 'b' and 'eof', -2 as mentioned

Next we encode the ASCII values of the leaves in the order from top to bottom, left to right. We can leave off the EOF (which is why it needs to be in the lower right):

61 6e 62  -- "a", "n" ,"b"

This is enough for the decompressor to rebuild the tree. Now we go on to encode the actual data.

Starting from the root, the Huffman codes are determined by adding a 0 for ever left branch and 1 for every right branch you have to take to get to your value:

a   -> right = 1
n   -> left+right = 01
b   -> left+left+left -> 000
eof -> left+left+right -> 001

banana<eof> would therefore be 000 1 01 1 01 1 001, or when grouped as bytes:

16  -- 0001 0110
C8  -- 1100 1   (000 as padding)

And that’s all we need:

$ printf '\x1f\x1e\x00\x00\x00\x06'\
'\x03\x01\x01\x00\x61\x6e\x62\x16\xc8' | gzip -d
banana

Unfortunately, the mentioned gzip bug triggers due to failing to account for leading zeroes in bit code. eof and a have values 001 and 1, so an oversimplified equality check confuses one for the other, causing gzip to terminate early:

b
gzip: stdin: invalid compressed data--length error

However, if you’re stuck with an affected version, there’s another party trick you can do: the Huffman tree has to be canonical, but it does not have to be optimal!

What would happen if we skipped the count and instead claimed that each ASCII character is equally likely? Why, we’d get a tree of depth 8 where all the leaf nodes are on the deepest level.

It then follows that each 8 bit character will be encoded as 8 bits in the output file, with the bit patterns we choose by ordering the leaves.

Let’s add a header with a dummy length to a file:

$ printf '\x1F\x1E____' > myfile.z

Now let’s append the afforementioned tree structure, 8 levels with all nodes in the last one:

$ printf '\x08\0\0\0\0\0\0\0\xFE' >> myfile.z

And let’s populate the leaf nodes with 255 bytes in an order of our choice:

$ printf "$(printf '\\%o' {0..254})" |
    tr 'A-Za-z' 'N-ZA-Mn-za-m' >> myfile.z

Now we can run the following command, enter some text, and hit Ctrl-D to "decompress" it:

$ cat myfile.z - | gzip -d 2> /dev/null
Jr unir whfg pbaivaprq TMvc gb hafpenzoyr EBG13!
<Ctrl+D>
We have just convinced GZip to unscramble ROT13!

Can you think of any other fun ways to use or abuse gzip‘s legacy support? Post a comment.

Buffers and windows: The mystery of ‘ssh’ and ‘while read’ in excessive detail

If you’ve ever tried to use ssh, and similarly ffmpeg or mplayer, in a while read loop, you’ll have stumbled upon a surprising interaction: the loop mysteriously aborts after the first iteration!

The solution, using ssh -n or ssh < /dev/null, is quickly spoiled by ShellCheck (shellcheck this code online), but why stop there? Let’s take a deep dive into the technical details surrounding this issue.

Note that all numbers given here are highly tool and platform specific. They apply to GNU coreutils 8.26, Linux 4.9 and OpenSSH 7.4, as found on Debian in July, 2017. If you use a different platform, or even just sufficiently newer versions, and wish to repeat the experiments, you may have to follow the reasoning and update the numbers accordingly.

Anyways, to first demonstrate the problem, here’s a while read loop that runs a command for each line in a file:

while IFS= read -r host
do
  echo ssh "$host" uptime
done < hostlist.txt

It works perfectly and iterates over all lines in the file:

ssh localhost uptime
ssh 10.0.0.4 uptime
ssh 10.0.0.7 uptime

However, if we remove the echo and actually run ssh, it will stop after the first iteration with no warnings or errors:

 16:12:41 up 21 days,  4:24, 12 users,  load average: 0.00, 0.00, 0.00

Even uptime itself works fine, but ssh localhost uptime will stop after the first one, even though it runs the same command on the same machine.

Of course, applying the aforementioned fix, ssh -n or ssh < /dev/null solves the problem and gives the expected result:

16:14:11 up 21 days,  4:24, 12 users,  load average: 0.00, 0.00, 0.00
16:14:11 up 14 days,  6:59, 15 users,  load average: 0.00, 0.00, 0.00
01:14:13 up 73 days, 13:17,  8 users,  load average: 0.08, 0.15, 0.11

If we merely wanted to fix the problem though, we'd just have followed ShellCheck's advice from the start. Let's keep digging.

You see similar behavior if you try to use ffmpeg to convert media or mplayer to play it. However, now it's even worse: not only does it stop after one iteration, it may abort in the middle of the first one!

All other commands work fine -- even other converters, players and ssh-based commands like sox, vlc and scp. Why do certain commands fail?

The root of the problem is that when you pipe or redirect to a while read loop, you're not just redirecting to read but to the entire loop body. Everything in both condition and body will share the same file descriptor for standard input. Consider this loop:

while IFS= read -r line
do
  cat > rest
done < file.txt

First read will successfully read a line and start the first iteration. Then cat will read from the same input source, where read left off. It reads until EOF and exits, and the loop iterates. read again tries to read from the same input, which remains at EOF. This terminates the loop. In effect, the loop only iterated once.

The question remains, though: why do our three commands in particular drain stdin?

ffmpeg and mplayer are simple cases. They both accept keyboard controls from stdin.

While ffmpeg encodes a video, you can use '+' to make the process more verbose or 'c' to input filter commands. While mplayer plays a video, you can use 'space' to pause or 'm' to mute. The commands drain stdin while processing these keystrokes.

They both also share a shortcut to quit: they will stop abruptly if any of the input they read is a "q".

But why ssh? Shouldn't it mirror the behavior of the remote command? If uptime doesn't read anything, why should ssh localhost uptime?

The Unix process model has no good way to detect when a process wants input. Instead, ssh has to preemptively read data, send it over the wire, and have sshd offer it on a pipe to the process. If the process doesn't want it, there's no way to return the data to the FD from whence it came.

We get a toy version of the same problem with cat | uptime. Output in this case is the same as when using ssh localhost uptime:

 16:25:51 up 21 days,  4:34, 12 users,  load average: 0.16, 0.03, 0.01

In this case, cat will read from stdin and write to the pipe until the pipe's buffer is full, at which time it'll block until something reads. Using strace, we can see that GNU cat from coreutils 8.26 uses a 128KiB buffer -- more than Linux's current 64KiB pipe buffer -- so one 128KiB buffer is the amount of data we can expect to lose.

This implies that the loop doesn't actually abort. It will continue if there is still data left after 128KiB has been read from it. Let's try that:

{
  echo first
  for ((i=0; i < 16384; i++)); do echo "garbage"; done
  echo "second"
} > file

while IFS= read -r line
do
  echo "Read $line"
  cat | uptime > /dev/null
done < file

Here, we write 16386 lines to the file. "first", 16384 lines of "garbage", followed by "second". "garbage" + linefeed is 8 bytes, so 16384 of them make up exactly 128KiB. The file prevents any race conditions between producer and consumer.

Here's what we get:

Read first
Read second

If we add a single line additional line of "garbage", we'll see that instead. If we write one less, "second" disappears. In other words, the expected 128KiB of data were lost between iterations.

ssh has to do the same thing, but more: it has to read input, encrypt it, and transmit it over the wire. On the other side, sshd receives it, decrypts it, and feeds it into the pipe. Both sides work asynchronously in duplex mode, and one side can shut down the channel at any time.

If we use ssh localhost uptime we're racing to see how much data we can push before sshd notifies us that the command has already exited. The faster the computer and slower the roundtrip time, the more we can write. To avoid this and ensure deterministic results, we'll use sleep 5 instead of uptime from now on.

Here's one way of measuring how much data we write:

$ tee >(wc -c >&2) < /dev/zero | { sleep 5; }
65536

Of course, by showing how much it writes, it doesn't directly show how much sleep reads: the 65536 bytes here is the Linux pipe buffer size.

This is also not a general way to get exact measurements because it relies on buffers aligning perfectly. If nothing is reading from the pipe, you can successfully write two blocks of 32768 bytes, but only one block of 32769.

Fortunately, GNU tee currently uses a buffer size of 8192, so given 8 full reads, it will perfectly fill the 65536 byte pipe buffer. strace also reveals that ssh (OpenSSH 7.4) uses a buffer size of 16384, which is exactly 2x of tee and 1/4x of the pipe buffer, so they will all align nicely and give an accurate count.

Let's try it with ssh:

$ tee >(wc -c >&2) < /dev/zero | ssh localhost sleep 5
2228224 

As discussed, we'll subtract the pipe buffer, so we can surmise that 2162688 bytes has been read by ssh. We can verify this manually with strace if we want. But why 2162688?

On the other side, sshd has to feed this data into sleep through a pipe with no readers. That's another 65536. We're now left with 2097152 bytes. How can we account for these?

This number is in fact the OpenSSH transport layer's default window size for non-interactive channels!

Here's an excerpt from channels.h in the OpenSSH source code:

/* default window/packet sizes for tcp/x11-fwd-channel */
#define CHAN_SES_PACKET_DEFAULT	(32*1024)
#define CHAN_SES_WINDOW_DEFAULT	(64*CHAN_SES_PACKET_DEFAULT)

There it is: 64*32*1024 = 2097152.

If we adapt our previous example to use ssh anyhost sleep 5 and write "garbage"
(64*32*1024+65536)/8 = 270336 times, we can again game the buffers and cause our iterator to get exactly the lines we want:

{
  echo first
  for ((i=0; i < $(( (64*32*1024 + 65536) / 8)); i++)); do echo "garbage"; done
  echo "second"
} > file

while IFS= read -r line
do
  echo "Read $line"
  ssh localhost sleep 5
done < file

Again, this results in:

Read first
Read second

An entirely useless experiment of course, but pretty nifty!
Swearing in the Linux kernel: now interactive

Graphs showing a rise in "crap" and fall in "fuck" over time.
 

If you’ve followed discussions on Linux, you may at some point have bumped into a funny graph showing how many times frustrated Linux kernel developers have put four letter words into the source code.

Today, for the first time in 12 years, it’s gotten a major revamp!

You can now interactively plot any words of your choice with commit level granularity.


Did you find any interesting insights? Post a comment!